go back to fergregory.com

Monday, December 13, 2010

Falling Letters

Falling letters


To make this one I made a fake book page in photoshop, then I printed it in the same size as the book and pasted it inside. At first I was gonna make the letters fall from the book into a little pile but it was way too complicated (to achieve without photoshop) so I made it simpler.
usually when I plan on making a photo I search a little in flickr to see if my idea is already "taken", turns out this one was but I still wanted to make it. :)

This is the book page (the text is from Alice in Wonderland ;)


 The Set-up

Tuesday, November 23, 2010

Apple Ice Cream


To make this one I made the melted part out of clay (the apple is real), I painted it with oil paint because I couldn't get the hue I wanted from watercolor, then I went to the ice cream shop to buy a cone and I put a little amount of clay inside it too.
The apple before I painted it

after the paint

Set-up

Sunday, November 21, 2010


Nothing special about this one, I just hanged a plastic frame with thread to an umbrella which was supported by my lighting tripods and then in PS I removed the thread. 

The Set-up

Camouflage (4)


To make this photo I went to my rooftop and used one of the mirrors from this shoot, put it in such a  way that it would only reflect the sky, then I painted a couple of clouds on my friend's face and placed an umbrella on her left.
Sofia wearing one of my shirts because I didn't want her clothes to get blue paint

The Set-up

Sunday, November 7, 2010

Rosa de agua

To take this picture I made a basic "rose" shape out of a plastic bottle, I taped it to a twig and then I placed them upside down to pour the water over it.
The shot is composed of several shots to make it look like there are petals, below are some photos that made this shot along with the set-up.


Saturday, November 6, 2010

Time

To make this shot I had to improvise everything! for the background I used a large piece of cardboard (that I painted previously for homework which was to recreate the shower scene from Psycho, that was my set) also the gears are made out of the same cardboard, I hanged the hourglasses with some thread to a wire and that's it (only the third one is glued to the cardboard).
no special lighting here, just the roof lamp.
Here's the set-up:

Thursday, November 4, 2010

Einstein

The tricky part here was to make the body of plaster and the hair with masking tape (and then joining them with hanger wire!), the desk is an old wood table and the blackboard is a cereal box with green paint I think.
here's the set-up:

Birds of a Feather

ßirds of a ƒeather


This one was really hard to make. I bought 2 big mirrors so she could reflect along with the sky, the doves are made of newspaper, to set-up this was difficult because she had to be on the border of the mirrors (which had sharp edges) and they weren't steady at all. to light this I used a photo lamp with an umbrella.
Here's the set-up:

Papery Maze

For this image I had to cut the paper sheets into smaller pieces to create false perspective, the top sheet is the only one at its full size. to hold them I used several things, from wooden sticks with clay to my tripod.
here's the set-up:


Tesla

To make Tesla, I used clay for the mustache, and black paper for the clothes, the head is a golden ball that I found in a drawer.  since this is too small, the lighting also had to be small; I used a DVD for the metal background, a photo light through an umbrella, a black light for the purple glow, and a small emergency lamp just to fill some shadows.
here's the set-up:

Wednesday, November 3, 2010

Sugar Rain...................Sugar Snow

Sugar Rain...................Sugar Snow 
For the rain one, I had my camera at a shutter speed of 1/40, and for the snow I had it at 1/2000.
both images are made with sugar to capture it I used 2 hard lights to the right and left of the umbrellas,
here's the set-up:

Another Dreamscape

Another Dreamscape
To make this photo we made the dress out of bed linens and curtains, I placed several light points like behind her to illuminate the wall, near her dress to illuminate the stairs and the fabric, for keylight I used my old work lamps with wax paper to diffuse the light.
here's the set-up:


My Inner Demons

My lnner demons
I can't remember how I came up with this (I think it was because I saw a tutorial somewhere on how to apply zombie texture to faces) but it shows me behind a table with other mes as demons.
the props on the table are (from left to right): a painting about abortion I did for art class, my magic eight ball on top of some notebooks, my dog keychain (it barks when you push it), my earphones, the black book is my physical portfolio, in the bowl is my mackech (a bug with plastic jewelry glued to his back), and on the right is a franken-dog on top of more notebooks.
no special lighting here, just my bedroom light.
here's the set-up:


Playing the piano

Playing the piano

For this photo I had to turn everything sideways (except for myself). I used fishing line to hang the clock on the wall and to keep still the flowers, the hardest part was to lift the piano, everything else was easier. to illuminate this I used a work lamp and natural light through the curtains.
here's the set-up:

Flying Cranes

Flying cranes

For this image I barely used Photoshop, the hardest part of this was to eliminate reflections on the glass, to do so I placed a black blanket (it was a dark blue actually but it was the closest I had to black) on the floor and since I didn't have any lighting for this (except the sun) later in Post-processing I brightened up the color a little and removed some dust I didn't clean off the glass.

here's the set-up:

Everybody Likes An Old Movie


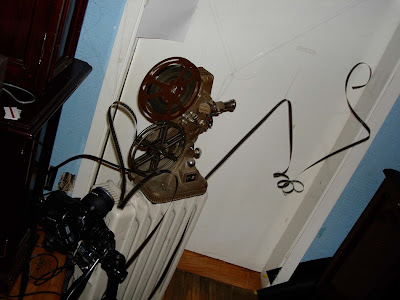
For this picture I remember that I had nothing to photograph (in my opinion), but then I remembered I had an old movie projector in the living room. So I took it to my room and since I didn't have any stool or table at hand I had to put it on the radiator, then I grabbed some fishing line I had in a drawer and then I taped it to the film. I used work lights for the lighting.
here's the set-up:

Microstock

In February of 2010 I embarked into the complicated world of microstock as a side project to my flickr account and I have to say that it's been a difficult journey but very rewarding in so many aspects, as of now I have around 300 photos online (not as much as I'd like to but it's something) and I can say that all those rejections have thought me how to make photos with greater quality, I am really grateful of all the sales that I make even if I don't have too many photos, but I know that someday soon I will be able to make a living out of this. I know It won't be easy, but I'm sure it'll happen.

if you want to see my online portfolios here are the links: (I have pretty much the same photos in the 3 sites)
Shutterstock
Dreamstime
Fotolia

Hello!

and welcome to my blog,
I made this just to share (those who are interested) a behind the scenes look on how I make my photos,
I'm not trying to make a self-absorbed blog or anything of the like, but I get e-mails asking me how I
create some of my images and I've found that the description space below every flickr photo is a little too small for this.
When you look at how I make my photos you may think that I use way too much Photoshop sometimes, I know, but I believe that when you don't have enough resources,  PS is a great way to get where you wanna go. (though I don't let this make me lazy, I always try to make everything real as much as I can)
anyway, I hope you like what you find here...
see ya!